Wednesday, August 19, 2015

Encyrpt Mule Properties with Jasypt with Complete Sample Code

Mule ESB uses Java properties file to set the dynamic properties for application. We all know we need to encrypt passwords in the property files. I know two ways to encrypt properties with Mule ESB.

One is to use Mule Enterprise Security module
https://developer.mulesoft.com/docs/display/current/Installing+Anypoint+Enterprise+Security I have posted step by step instructions here: http://blogs.perficient.com/integrate/2016/05/16/mule-enterprise-security-password-encryption-steps/

The other one is Jasypt
This post will follow the above blog and show an end to end example of Jasypt with full sample code.  I’ll cover the other method in a different post.

Let’s get started.

Step 1. Create a Hello World Application
   <http:listener-config name="HTTP_Listener_Configuration" host="0.0.0.0" port="8081" doc:name="HTTP Listener Configuration"/>
    <flow name="encryptFlow">
        <http:listener config-ref="HTTP_Listener_Configuration" path="/enc" doc:name="HTTP"/>
       <expression-filter expression="#[message.inboundProperties.'http.request.uri' != '/favicon.ico']" doc:name="Filter favicon" />
        <set-payload value="Hello World" doc:name="Set Payload"/>
        <logger message="#[payload] " level="INFO" doc:name="Logger"/>
</flow>

Do a quick test to make yourself feel good.

Step 2. Mavenize the project
Right click on the project name, move to “Maven support in studio”, then select “Mavenize”
This will create a pom.xml for you.
I would like to point out, if you are not happy at any point with your Maven pom.xml, you can chose to delete pom.xml (backup if needed), and then re-run the above step to Mavenize it again.

Step 3. Add a property file to the project
The default property file is my-app.properties. But you should create your own under "src/main/resources". Let’s create “enc.properties” over there.
p1=hello
p2=world
p3=welcome1
p4=foo
Let’s change the flow
        <set-payload value="Here are the parameters p1=${p1} p2=${p2} p3=${p3} p4=${p4}" doc:name="Set Payload"/>

If you test the program, it may not pick up those properties. If that’s the case, add this line right above the flow

<context:property-placeholder location="enc.properties" />

Test it again, you should see “Here are the parameters p1=hello p2=world p3=welcome1 p4=foo”. If not, try to re-generate the pom.xml again. Hope that solves your problem.

Step 4.  Add Jasypt dependency to pom
             <dependency>
               <groupId>org.jasypt</groupId>
               <artifactId>jasypt-spring3</artifactId>
               <version>1.9.1</version>
             </dependency>

Step 5. Add the spring bean section from this post http://blogs.mulesoft.com/dev/mule-dev/encrypting-passwords-in-mule/
   <spring:beans>
        <spring:bean id="environmentVariablesConfiguration" class="org.jasypt.encryption.pbe.config.EnvironmentStringPBEConfig">
            <spring:property name="algorithm" value="PBEWithMD5AndDES"/>
<!--             <spring:property name="passwordEnvName" value="MULE_ENCRYPTION_PASSWORD"/> -->
            <spring:property name="password" value="mypass"/>
        </spring:bean>
        <spring:bean id="configurationEncryptor" class="org.jasypt.encryption.pbe.StandardPBEStringEncryptor">
            <spring:property name="config" ref="environmentVariablesConfiguration"/>
        </spring:bean>
        <spring:bean id="propertyConfigurer" class="org.jasypt.spring.properties.EncryptablePropertyPlaceholderConfigurer">
            <spring:constructor-arg ref="configurationEncryptor"/>
            <spring:property name="locations">
                <spring:list>
                    <spring:value>enc.properties</spring:value>
                </spring:list>
            </spring:property>
        </spring:bean>
    </spring:beans>

<!--    <context:property-placeholder location="enc.properties" /> -->

Please note 1) I commented out the above “property-placeholder” line. Spring bean we are adding should be sufficient to make the applicaiton include the property file. 2) I have put enc.properties in the “locations” section. 3) I commented out “passwordEnvName”, and added “password” property. I’ll explain 3) later.

If the compiler whines, you may consider re-generating the pom again, remember to put Jasypt dependency back in if you ended up regenerating the POM file.

If everything works, your application should work exactly like before. If not, then you may need to 
stop the application if you are running inside the studio, and re-run it again. Sometimes, the property file change is not picked up properly without restarting the application.

Step 6. Encrypt the Parameters
In command window, run this (you need to pick your own path to the “jasypt” jar file):

java -cp C:\m2\repository\org\jasypt\jasypt\1.9.1\jasypt-1.9.1.jar org.jasypt.intf.cli.JasyptPBEStringEncryptionCLI input="hello" password="mypass" algorithm=PBEWithMD5AndDES

Run the same command for “world”, “welcome1”.

You should have 3 encrypted string for “hello”, “world”, “welcome1” . Put them in the property file like below, the encrypted strings are inside ENC():
p1=ENC(jDkJK7Ns+OJCRXAZ+7kcUA==)
p2=ENC(eMgHrLD5bPQrVEhu4yOaZw==)
p3=ENC(ennXknKsiEUhAO1a4rpuMXonJ94Nooa1)
p4=foo

Now re-run the program again, you should get the same result. This illustrates that the encryption/decryption is working properly.

Step 7. Wrap it up (using environment variable to keep your master password)

I have copied the final finished source code at the end.
A few notes here:
1    In the previous step, I used “password” property to test the encryption/decryption without using the environment variable
2     In the final code, I have removed (commented out) the “password” property and put back in “passwordEnvName” property, in this case, it is called “MULE_ENCRYPTION_PASSWORD”. This is telling you that you need to setup an environment variable “MULE_ENCRYPTION_PASSWORD” with the value “mypass”.
3      After you setup environment variable, you may need to restart the studio, so it can pick up the environment variable (if you are running standalone Mule ESB, you may need to close that command window and start a new command window, then restart Mule ESB)

Is it safe to use the env varialbe to keep the password? Well, password need be specified by the admin, it has to be somewhere. As explained in the other posts, you can setenv right before you start the server,then unset the env varialbe right after the server is started.

That should be it!

<?xml version="1.0" encoding="UTF-8"?>

<mule xmlns:context="http://www.springframework.org/schema/context"
       xmlns:http="http://www.mulesoft.org/schema/mule/http" xmlns="http://www.mulesoft.org/schema/mule/core" xmlns:doc="http://www.mulesoft.org/schema/mule/documentation"
       xmlns:spring="http://www.springframework.org/schema/beans" version="EE-3.7.0"
       xmlns:xsi="http://www.w3.org/2001/XMLSchema-instance"
       xsi:schemaLocation="
http://www.springframework.org/schema/context http://www.springframework.org/schema/context/spring-context-current.xsd http://www.springframework.org/schema/beans http://www.springframework.org/schema/beans/spring-beans-current.xsd
http://www.mulesoft.org/schema/mule/core http://www.mulesoft.org/schema/mule/core/current/mule.xsd
http://www.mulesoft.org/schema/mule/http http://www.mulesoft.org/schema/mule/http/current/mule-http.xsd">

   <spring:beans>
        <spring:bean id="environmentVariablesConfiguration" class="org.jasypt.encryption.pbe.config.EnvironmentStringPBEConfig">
            <spring:property name="algorithm" value="PBEWithMD5AndDES"/>
            <spring:property name="passwordEnvName" value="MULE_ENCRYPTION_PASSWORD"/>
<!--             <spring:property name="password" value="mypass"/>  -->
        </spring:bean>
        <spring:bean id="configurationEncryptor" class="org.jasypt.encryption.pbe.StandardPBEStringEncryptor">
            <spring:property name="config" ref="environmentVariablesConfiguration"/>
        </spring:bean>
        <spring:bean id="propertyConfigurer" class="org.jasypt.spring.properties.EncryptablePropertyPlaceholderConfigurer">
            <spring:constructor-arg ref="configurationEncryptor"/>
            <spring:property name="locations">
                <spring:list>
                    <spring:value>enc.properties</spring:value>
                </spring:list>
            </spring:property>
        </spring:bean>
    </spring:beans>

<!--    <context:property-placeholder location="enc.properties" /> -->

    <http:listener-config name="HTTP_Listener_Configuration" host="0.0.0.0" port="8081" doc:name="HTTP Listener Configuration"/>
    <flow name="encryptFlow">
        <http:listener config-ref="HTTP_Listener_Configuration" path="/enc" doc:name="HTTP"/>
       <expression-filter expression="#[message.inboundProperties.'http.request.uri' != '/favicon.ico']" doc:name="Filter favicon" />
        <set-payload value="Here are the parameters p1=${p1} p2=${p2} p3=${p3} p4=${p4}" doc:name="Set Payload"/>
        <logger message="#[payload] " level="INFO" doc:name="Logger"/>
    </flow>
</mule>

For the sake of completeness, I am including the pom.xml as well, which really doesn’t have anything special:
<?xml version="1.0" encoding="UTF-8"?>
<project xmlns="http://maven.apache.org/POM/4.0.0" xmlns:xsi="http://www.w3.org/2001/XMLSchema-instance"
       xsi:schemaLocation="http://maven.apache.org/POM/4.0.0 http://maven.apache.org/maven-v4_0_0.xsd">

       <modelVersion>4.0.0</modelVersion>
       <groupId>com.mycompany</groupId>
       <artifactId>encrypt</artifactId>
    <version>1.0.0-SNAPSHOT</version>
    <packaging>mule</packaging>
       <name>Mule encrypt Application</name>

    <properties>
             <project.build.sourceEncoding>UTF-8</project.build.sourceEncoding>
             <project.reporting.outputEncoding>UTF-8</project.reporting.outputEncoding>

             <mule.version>3.7.0</mule.version>
       <mule.tools.version>1.1</mule.tools.version>
       </properties>

       <build>
             <plugins>
                    <plugin>
                           <groupId>org.mule.tools.maven</groupId>
                           <artifactId>mule-app-maven-plugin</artifactId>
                           <version>${mule.tools.version}</version>
                           <extensions>true</extensions>
                           <configuration>
                    <copyToAppsDirectory>true</copyToAppsDirectory>
                           </configuration>
                    </plugin>
                    <plugin>
                           <artifactId>maven-assembly-plugin</artifactId>
                           <version>2.2.1</version>
                           <configuration>
                                 <descriptorRefs>
                                        <descriptorRef>project</descriptorRef>
                                 </descriptorRefs>
                           </configuration>
                    </plugin>
                    <plugin>
                           <groupId>org.codehaus.mojo</groupId>
                           <artifactId>build-helper-maven-plugin</artifactId>
                           <version>1.7</version>
                           <executions>
                                 <execution>
                                        <id>add-resource</id>
                                        <phase>generate-resources</phase>
                                        <goals>
                                               <goal>add-resource</goal>
                                        </goals>
                                        <configuration>
                                               <resources>
                                                     <resource>
                                                            <directory>src/main/app/</directory>
                                                     </resource>
                                                     <resource>
                                                            <directory>mappings/</directory>
                                                     </resource>
                                               </resources>
                                        </configuration>
                                 </execution>
                           </executions>
                    </plugin>
             </plugins>
       </build>

       <!-- Mule Dependencies -->
       <dependencies>
             <dependency>
               <groupId>org.jasypt</groupId>
               <artifactId>jasypt-spring3</artifactId>
               <version>1.9.1</version>
             </dependency>
      
             <!-- Xml configuration -->
             <dependency>
             <groupId>com.mulesoft.muleesb</groupId>
                    <artifactId>mule-core-ee</artifactId>
                    <version>${mule.version}</version>
                    <scope>provided</scope>
             </dependency>
             <!-- Xml configuration -->
             <dependency>
                    <groupId>com.mulesoft.muleesb.modules</groupId>
                    <artifactId>mule-module-spring-config-ee</artifactId>
                    <version>${mule.version}</version>
                    <scope>provided</scope>
             </dependency>
             <!-- Mule Transports -->
             <dependency>
                    <groupId>org.mule.transports</groupId>
                    <artifactId>mule-transport-file</artifactId>
                    <version>${mule.version}</version>
                    <scope>provided</scope>
             </dependency>
             <dependency>
                    <groupId>org.mule.transports</groupId>
                    <artifactId>mule-transport-http</artifactId>
                    <version>${mule.version}</version>
                    <scope>provided</scope>
             </dependency>
             <dependency>
             <groupId>com.mulesoft.muleesb.transports</groupId>
                    <artifactId>mule-transport-jdbc-ee</artifactId>
                    <version>${mule.version}</version>
                    <scope>provided</scope>
             </dependency>
             <dependency>
             <groupId>com.mulesoft.muleesb.transports</groupId>
                    <artifactId>mule-transport-jms-ee</artifactId>
                    <version>${mule.version}</version>
                    <scope>provided</scope>
             </dependency>
             <dependency>
                    <groupId>org.mule.transports</groupId>
                    <artifactId>mule-transport-vm</artifactId>
                    <version>${mule.version}</version>
                    <scope>provided</scope>
             </dependency>
             <!-- Mule Modules -->
             <dependency>
                    <groupId>org.mule.modules</groupId>
                    <artifactId>mule-module-scripting</artifactId>
                    <version>${mule.version}</version>
                    <scope>provided</scope>
             </dependency>
             <dependency>
                    <groupId>org.mule.modules</groupId>
                    <artifactId>mule-module-xml</artifactId>
                    <version>${mule.version}</version>
                    <scope>provided</scope>
             </dependency>
             <!-- for testing -->
             <dependency>
                    <groupId>org.mule.tests</groupId>
                    <artifactId>mule-tests-functional</artifactId>
                    <version>${mule.version}</version>
                    <scope>test</scope>
             </dependency>
       </dependencies>

       <repositories>
          <repository>
            <id>Central</id>
            <name>Central</name>
            <url>http://repo1.maven.org/maven2/</url>
            <layout>default</layout>
        </repository>
        <repository>
            <id>mulesoft-releases</id>
            <name>MuleSoft Releases Repository</name>
            <url>http://repository.mulesoft.org/releases/</url>
            <layout>default</layout>
        </repository>
        <repository>
            <id>mulesoft-snapshots</id>
            <name>MuleSoft Snapshots Repository</name>
            <url>http://repository.mulesoft.org/snapshots/</url>
            <layout>default</layout>
        </repository>
    </repositories>
    <pluginRepositories>
        <pluginRepository>
            <id>mulesoft-release</id>
            <name>mulesoft release repository</name>
            <layout>default</layout>
            <url>http://repository.mulesoft.org/releases/</url>
            <snapshots>
                <enabled>false</enabled>
            </snapshots>
        </pluginRepository>
    </pluginRepositories>

</project>


Mule DataWeave and DB insert Operation


With the recent release of Mule ESB 3.7, DataWeave is replacing DataMapper as the new mapping tool. DataMapper is deprecated in 3.7. You actually need install a plugin for the DataMapper to work on the stand alone Mule ESB.
DataWeave is so new there are few online resources available. I have found the following 3 online resources that helped me to get started.

As a beginner of DataWeave, I have learned a few things through trial and error. I’m posting up these notes to help myself in my learning process.

Comparing with previous DataMapper, I personally see some pros and cons:

DataWeave Pros:
  • 3 data panels on the same screen, the output samples is updated simultaneously as you update the code/script (when it works).  
  • You can switch between the output format spontaneously by modifying /java, /json, /csv etc
  • You can have multiple outputs with different formats
  • The mapping script/code is inside the same XML file, so you don’t have to track another file somewhere else
  • The syntax is much easier than the DataMapper complex groovy code
  • Other misc. benefits, such as selecting default value is a breeze


DataWeave Cons:
  • New release, limited learning resources available
  • limited GUI function, no drag and drop
  • You can type code directly in, if the output doesn’t match the output, then you are on your own.
  • Some bugs still need be flushed out.


Before I even start, let me clarify a trivial detail. When you fire up Anypoint Studio, there is no such thing as “DataWeave”, it is actually called “Transform Message”. With that out of the way, I am using “DataWeave” liberally in this post, so long you understand what I’m referring to.

One common usage of DataWeave is to transform data in a format that will go into database. Besides general notes on DataWeave, I’ll show a few things within the context of DB insert.

1.      Manually declare the input/output data format:
In order for DataWeave to show the input (panel), processing script (panel), and the output (panel) correctly, it relies on DataSensor to sense the input and output payload formats correctly. Sometimes that format information is not available. For example, in the case the input/out XML strings do not have associated schemas. You can manually declare the input data format so DataSendor can pick up the formats: 1) click on the predecessor of Transform Message processor 2) select MetaData, 3) select the “output”, 4) select the editor button 4) pick your XSD.
By the same token, you can pick the output format by setting the input format for the subsequent processor.

2.      DB insert data format:
In the Oracle SOA/OSB world, before invoking a DB insert operation, you must have a clearly defined XSD for the insert operation. So a natural question to ask is what is the input data format for Mule ESB DB insert operation? You noticed that I didn’t say “input XSD”, because, unlike SOA/OSB, Mule ESB doesn’t exclusively work with XML format.

Technically, the data in the insert statement can come from different sources (not just from the payload) in various formats.

Although there are various formats to use for DB insert, it is important to know that things work the best if the DB insert (non-bulk) is defined like this:
“insert (cola, colb, …) values (#[payload.a], #[payload.b], …)”.
This is equivalent to saying the DB processor “expects” (defines) the input to be a Java LinkedHasMap like
{a=’foo’, b=’bar’).
If you declare your insert statement this way, then DataSensor can pick up (sense) this format automatically.

There is not much compile time enforcement of the input data format with DataWeave/DB insert. If your insert input is not what is expected, then the DB operation will throw exception at runtime.

Technically, the DB insert can extract data from anywhere using any valid syntax. For example, I can have
“insert into … (acol, bcol, ccol) values (#[xpath3('/per:person/per:emplId')], #[flowVars.b], #[flowVars.c])”
The only thing the statement implies is the payload is XML and should have this element ‘/per:person/per:emplId'.

When you have insert statement like this, then DataSensor can’t help you at all. You are totally on your own to make sure the payload is formatted as expected. i.e “payload” has the correct XML data, and flowVars “b”,  “c” are filled with correct values. If you drag a Transform Message in front of such a DB insert, the Transform Message won’t show any sample output, because it simply doesn’t handle complex data format like this. In this case, you’ll have to guarantee with your own eyes that the mapping scripts (text) are entered correctly.

To sum it up one more time, when the insert statement is coded, it “declares” where (and how, to certain degrees) the data is going to come from. That declaration becomes the “expected” input data format. If it comes from multiple input sources, you need to prepare those data items (payload, flowVars or whatever) accordingly.

When the insert statement is pure like “insert … (x, y, …) values (#[payload.a], #[payload.b],…)”, then you will get most help from the DataWeave as you type your mapping script/code.

3.      More DB Insert Example
What if you have an insert statement like below?
 “insert … (addr, city, zip, fname, lname, …) values (#[payload.addr], #[payload.city], #[payload.name.first], #[payload.name.last],…)”,
Then you need prepare your LinkedHasMap “payload” like this:
{addr=’111’, city=’DC’, zip=’000’, name { first=’foo’, last=’bar’}…}
Please note, even with this small variation in (expected) insert format, DataWeave struggles to fully support the output sample panel.

4.      Now let’s take a look at the Bulk Insert operation.
Suppose you have “insert into … (addr1, addr2, addr3…) values (#[payload.addr1], #[payload.addr2], …), and “bulkMode=true”. Then the expected input format is
[
{addr11, addr12, addr13},
{addr21, addr22, addr23},
]
However, it is not always possible to translate the output into the above format with DataWeave. My trick is to do 2 steps:
address: payload.ns0#person.ns0#personContact.*ns0#address map {
        address1: $.ns0#address1,
        address2: $.ns0#address2,
...
}
Then followed by
<set-payload values=”#[payload.address]" doc:name="setAddrRecs" />
Now your input is an ArrayList of LinkedHashMap, which is the builkInsert expected format in this case.

5.      Do not put DB to_date() inside DataWeave
It’s too tempting to do this in DataWeave script:
       birthdate:  "to_date('" ++ payload.ns0#person.ns0#demographics.ns0#birthDate ++ "', 'yyyy-mm-dd')"
then use it in the insert directly like: insert … #[payload.birthdate]… 
That will fail miserably. Instead, do this:
DataWeave script:
             birthdate:  payload.ns0#person.ns0#demographics.ns0#birthDate
 DB: insert … to_date(#[payload.birthdate], 'yyyy-mm-dd')
6.      DataWeave default value
DataWeave script:
 address: payload.ns0#person.ns0#personContact.*ns0#address map {
               address1: $.ns0#address1 default '  ',
               address2: $.ns0#address2 default '  ',
What does it do?
If input element <address1> doesn’t exist, it will fill in space for output “address1”. However, if the input has <address1/> (empty element), then the output “adddress1” will be “”. If you want output address1=” “ for both cases, then you need this:
address1: $.ns0#address1 when ($.ns0#address1? and $.ns0#address2 != "") otherwise  '  ',

7.      “zip” is reserved?
It appears to me “zip” has some special meaning internally.

I cannot put anything after a field with name “zip:”. I can’t put zip: blah default ‘99999. In fact, I can’t even put zip as the last field in the mapping, because that requires a “}” after “zip”, even that will cause dataWeave to fails. So either it’s a bug or it’s an undocumented internally reserved keyword.

Tuesday, August 18, 2015

Use Mule AMQPS (SSL) to Connect to RabbitMQ

This post provides step by step instructions to enable SSL with RabbitMQ; then use AMQPS connector with Mule ESB.


Part I – Enable SSL on RabbitMQ

Finished view of the directories for the certificates:

I just want to give you an overview of directories of certificates. It may help you navigate the paths as you generate the certificates in the next few sections:

D:\MULE\ssl
├───client
├───server
└───testca
    ├───certs

└───private

CA: Certificate Authority


Download openSSL if you haven’t done so. I used ftp://ftp.openssl.org/source/

Select a working directory, I use “d:\mule\ssl”, you can pick your own.
The instructions are a mirror of the online instructions followed by some extra notes when necessary.

 mkdir testca
 cd testca
 mkdir certs private (create two directories)
 chmod 700 private (no action on windows)
 echo 01 > serial (create file with text editor, just put one line with “01”, no extra contents)
 touch index.txt (create an empty index.txt file, no extra contents or blank lines, otherwise, it would cause problems)

copy the content of the cnf file and put in the following file:
set OPENSSL_CONF=D:\mule\ssl\testca\openssl.cnf (very important step on Windows, otherwise, you’ll have many problems)

openssl req -x509 -config openssl.cnf -newkey rsa:2048 -days 365 -out cacert.pem -outform PEM -subj /CN=MyTestCA/ -nodes
openssl x509 -in cacert.pem -out cacert.cer -outform DER

Server Certificates


cd .. (moves to your working directory)
mkdir server
 cd server
 openssl genrsa -out key.pem 2048
 openssl req -new -key key.pem -out req.pem -outform PEM     -subj /CN=meng04/O=server/ -nodes

 cd ../testca
 openssl ca -config openssl.cnf -in ../server/req.pem -out     ../server/cert.pem -notext -batch -extensions server_ca_extensions

 cd ../server
 openssl pkcs12 -export -out keycert.p12 -in cert.pem -inkey key.pem -passout pass:MySecretPassword

Client Certs


cd .. (move to your working directory)
mkdir client
 cd client
 openssl genrsa -out key.pem 2048
 openssl req -new -key key.pem -out req.pem -outform PEM     -subj /CN=meng04/O=client/ -nodes

cd ../testca
 openssl ca -config openssl.cnf -in ../client/req.pem -out     ../client/cert.pem -notext -batch -extensions client_ca_extensions

 cd ../client
 openssl pkcs12 -export -out keycert.p12 -in cert.pem -inkey key.pem -passout pass:MySecretPassword

Create Keystore

keytool -import -alias meng04 -file d:/mule/ssl/server/cert.pem -keystore d:/mule/ssl/client/trustStore.jks

Import CA Cert

I kind of do not believe you need to run this step though!! You can experiment with this step.
From command line run “certmgr”
right click root CA, import, D:\mule\ssl\testca\cacert.cer

RabbitMQ Config file


On Windows, make sure you login as the user who installed RabbitMQ!
On command prompt, run “set AppData” or “echo %AppData”, that should show you the default path where RabbitMQ config and log files are: by default, it is under %AppData%/RabbitMQ (example, c:\users\yourusername\Roaming\RabbitMQ).

Modify  (create if needed)  rabbitmq.config, put in

[
  {rabbit, [
   {tcp_listeners, []}},
      {ssl_listeners, [5671]},
     {ssl_options, [{cacertfile,"d:/mule/ssl/testca/cacert.pem"},
                    {certfile,"d:/mule/ssl/server/cert.pem"},
                    {keyfile,"d:/mule/ssl/server/key.pem"},
                    {verify,verify_peer},
                    {fail_if_no_peer_cert,false}]}
   ]}
].

   {tcp_listeners, []}} will disable default port 5672, take it out if you want both standard and SSL ports

Part II – Use AMQPS Connector


Assuming you got your AMQP (without “S” at the end) working, here is what you need to do for AMQPS:

Declaration


In your Mule application XML file, add the following at the beginning of the namespace section:
Schema prefix:
Schema location:
http://www.mulesoft.org/schema/mule/amqps http://www.mulesoft.org/schema/mule/amqps/current/mule-amqps.xsd

AMQPS connector configuration


<amqps:connector name="AMQP_0_9_ConnectorSSL" validateConnections="true" doc:name="AMQP-0-9 Connector" virtualHost="/”  host="myhost" password=”mypass" port="5671" username=”myname" >
        <amqps:ssl-key-store path="d:/mule/ssl/client/keycert.p12" type="PKCS12"
            algorithm="SunX509" keyPassword="MySecretPassword" storePassword="MySecretPassword" />
        <amqps:ssl-trust-store path="d:/mule/ssl/client/trustStore.jks" type="JKS" -->
            algorithm="SunX509" storePassword="rabbitstore" />          
</amqps:connector>   

Endpoint

   <amqps:inbound-endpoint queueName="my-Q" queueDurable="true" responseTimeout="10000" doc:name="AMQP-0-9-subscribe-CDM" connector-ref="AMQP_0_9_ConnectorSSL" />


That’s it. When I get the chance, I’ll post up the source code.

Friday, July 3, 2015

Install CentOS 7 on Virtualbox

I installed CentOS 7 on virtualbox not long ago. A few bumps on the road, this post will help me jolt my memory in case I have to do it again.

1. Download CentOS-7-x86_64-DVD-1503-01.iso
2. Click “New” on Virtualbox Manager, enter your new virtual machine name “CentOS 7”
3. Select mem size, I picked 4G
4. Default “create a virtual hard drive now”
5. In the popup, default “VDI”, default “Dynamically allocated”, pick hard drive name, I picked a name without spaces, I picked 100G size.
6. Your VM “CentOS 7” is created, no OS installed yet.

7. Click on the new machine, then click Settings
8. I have an “empty” under Controller: IDE, click on it to have it selected
9. On the right hand side (under attributes), I see CD/DVD drive, there is a DVD icon, click on the icon, select “choose virtual CD/DVD disk file”
10. Navigate to your  CentOS-7-x86_64-DVD-1503-01.iso
11. Start your VM, you may have multiple available ISOs to choose, select “CentOS-7-x86_64-DVD-1503-01.iso” to start your VM 
12. Select Install CentOS 7
13. It will complain about input capture, you need to use “right control” key to navigate between host and VM
14. Importantly, select “Software selection”, then select “GNOME Desktop”. Here is why: when I didn’t select a desktop and tried to configure “Guest additions”, I wasted numerous hours trying to patch up the system to get it working, I just couldn't get it to work without the Desktop version. Then I re-installed the system and selected the “GNOME Desktop” version, I didn’t have to patch up anything, “Guest additions” worked flawlessly.

Two other important notes (I had relearn these tricks so many times after a while, hence the notes here):

1. if you get "Fast TSC calibration failed.", don't panic, don't just stare at the black error screen. For me, I just hit return key. That seems to do the trick for me. \

2. when you don't have network connection inside VM, run as (root), dhclient command!

Convert a Danby Chest Freezer to a Frig

Yes, you read the title right. Instead of XSLT transformer, I’m doing a real world transformation this time.

SOA 12C has not caught on fire; posting old stuff is getting boring. So I thought I'll pick up a new topic for a change.

I bought a Danby chest freezer last year. They are not kidding when they called it a freezer. Although it came with a temperature dial, the highest temp you can set is way below freezing. It is puzzling to me why won't they provide a wider temp range so user can operate it either as a freezer or fridge.

I thought there would be an easy way to rig the temp control somewhere to fool the system. After searching online, I found out there is no easy trick. I decided to bite the bullet and give it a try to replace the controller myself. It was quite an enlightening experience. I stumbled on so many trivial things that pros didn’t bother to mention, after I overcame those problems, I thought I would share it so it may benefit other amateurs like me.

I ordered an 110V STC 1000 digital temp controller for about $23 (including shipping) from amazon.com.  When I opened the box, I got more questions than answers. After much online reading, a few trips to RadioShack and Home Depot, this is what I finally sorted out:

How does the existing controller work?


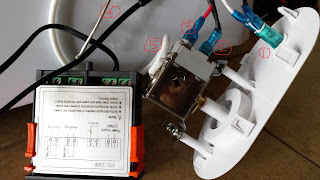
The picture on the left shows the original controller. The picture below shows the STC-1000 controller (on the left) next to the original, It's not wired yet.


The original sensor came with a metal probe, that metal probe (I circled #4 on the drawing below) is directly linked to the controller with a white insulated line circled #5. The white cover is the temperature insulation, I believe that mechanical temperature sensor relies on that probe to transmit some chemical gas pressure based on the temperature change inside the freezer. That also explains why there is no power supply to the original controller itself. The mechanic controller acts a switch to connect and disconnect the power from the black hot line (circled #2) and red line (circled #3), which delivers the power to the frig.

In the picture where I circled #1 is an always on LED light.

Switching to STC 1000

There are 4 pairs of wire terminals on the back STC 1000.

Wiring the sensor:
Terminals 3 & 4 are for the sensor that came with the unit. The digital sensor is the black blob on the tip of the wires. The wires are actual signal lines. I simply routed the sensor wire from the side of the frig, then tossed the tip inside the frig. Because the wire is signal wire, it doesn’t matter it’s exposed to the room temperature.


The overall power wiring.
There are three parts which need power:
·        Circle (a) – LED indicator
·        Circle (b) – STC power supply
·        Circle (c) – switch that delivers power (red line) to the frig
I used (e) and (d) to split the incoming power from (e)
·        (e) splits power to (d) and (a),
·        (d) redistributes power to (b) and (c)

Wiring Specifics:
Circle (a) shows the indicator wiring:
 I got the original neutral white and original black wire so the indicator has constant power.
Circle (b) shows the controller power wiring (they are terminals 1&2 on STC-1000).
I got the piggybacked neutral white, then got black power line from (d)
Circle (c) shows the power switch wiring (they are terminals 7&8 on STC-1000):
I got black power line from (d), then the red line goes to the frig unit. As temperature changes, the switch will connects/disconnects the power to the red line, and therefore control the refrigerator.

When all said and done, it was a refreshing experience! I got a digital controller and I can set the temperature to anything I like, although it's in celcius only :)

To configure the digital controller, you'll just need to google STC-1000 user manual. My unit came so cheap, it didn't even include a print out.

Please note the STC-1000 comes with power deliverying circuits. One for cooling (terminal 7&8). One for heating (terminals 5&6).

Since I only need the cooling, I left the heating terminals unwired. The purpose of both cooling and heating is to control an incubator, which requires constant temperature. When inside tempearture is above the set value, the cooling unit kicks in. (Obviously, I only have cooling unit). When it's below the set temperature, the heating unit will kick in.

The photos below shows how I made a replacement control panel with a cut out plastic part. The project costed me a whole weekend.


Wednesday, February 19, 2014

Import Data into Salesforce

It's such a common topic. It's covered by numerous posts, SF documents, tutorials and even on youtube. However, as I embark on the journey, with the help of all the online resource, I still need to feel my own way through. Here is my lesson while uploading the initial Accounts and Contacts data.

1. Data Loader (locally installed exe) is generally considered more powerful and can load larger amount of data than the Wizard. However, Data Loader can only load one type of records in a data file! Furthermore, it uses SF internal ID (one of those funky long 15 or 18 characters ID's).

The implication is not very pleasant. If you need to import Accounts and Contacts, then you need to import Account first, then retrieve the ID's, then update your Contact data file to correlate the SF internal ID's for Accounts. I think that's too much for my case.

2. Luckily for me, I only need a single piece of data for Account, when I generated the Contacts CSV file, I placed the account name into the "Account" column. Import wizard auto generates the Accounts using that column.

3. Rest of the CSV field names should use "Field Label", not the actual "Field Name", definitely not the xxx__c name, otherwise. You have to manually map any fields if Wizard cannot auto map them.

4. date format uses mm/dd/yyyy (i suppose it's defined by the object field in SF?)

5. boolean takes "true/false" (maybe configurable in SF?)


Wednesday, January 29, 2014

Use force.com Rest API to upload documents or attachment

It took me hours and hours try use force.com Rest API to upload documents and attachments. It didn't help the developer guide only shows upload the document. I guess you are supposed to figure out how to add attachment. Anyway, here are the hoops I had to jump through.

Let's look at document first.

I follow this doc:
http://www.salesforce.com/us/developer/docs/api_rest/index_Left.htm#CSHID=dome_sobject_insert_update_blob.htm|StartTopic=Content%2Fdome_sobject_insert_update_blob.htm|SkinName=webhelp

Pay close attention to a couple of things:

the URL in the sample is: curl https://na1.salesforce.com/services/data/v23.0/sobjects/Document/ -H "Authorization:
Bearer token" -H "Content-Type: multipart/form-data; boundary=\"boundary_string\""
--data-binary @newdocument.json

* replace your own URL, yours won't be "na1"!
* the last part of the URL is "/Document/" for document. For attachment is "/Attachment/"
* @newdocument.json means the cURL will read in the file (pardon me, not a json guy)
* In the sample jason code, it shows "FolderId" : "00lJ0000000HzyY". Normally, with na1salesforce.com/xyz, xyz is the object ID. But for document folder, it looks like salesforce.com/015?fcf=00lJ0000000HzyY, use the last part after cfc=.
*use this text file to test your upload before you try binary file:

--boundary_string
Content-Disposition: form-data; name="entity_content";
Content-Type: application/json

{"Description":"Marketing brochure for Q1 2013","Keywords":"marketing,sales,update","FolderId":"00lJ0000000HzyY","Name":"Marketing Brochure Q1","Type":"text"}

--boundary_string
Content-Disposition: form-data; name="Body"; filename="fakefile.txt";
Content-Type: text/plain

This is the content of my fake file

--boundary_string--

* trick to create binary json file: create a header.txt (everything before "This is the content of the my fake file", and tail.txt (just the last line). Make sure newlines accounted for. Now run copy header.txt + test.pdf/b+tail.txt newdocument.json
notice there is "/b" after the binary file name, in this case, it's pdf. you need to update header to change to "PDF' where applicable, for example: Content-Type: application/pdf

Now let's move on to attachment:

You need to change two things:

1. the URL, last part needs be "/Attachment".
2. in the json property, i modified it to be {"Description":"Marketing brochure for Q1 2013","ParentId":"a00J0000006ntLCIAY","Name":"Marketing Brochure Q1"}. I removed "Keywords", "Type", replaced with "ParentId", this is the object ID to which you want to add the attachment to.

I'm sure there are other properties you can play with. That's quite enough for me for now.