If you need to create multiple domains on your localhost for testing purpose, here is what I do:
Create 1st domain as normal.
For 2nd (and each additional) domains:
1. use config wizard to set up the domains, until towards the end
2. on "Select Optional Configuration" screen, check "Administration Server", then you can select a different admin port (i believe you can also simply change the port after config, use config.xml with <listen-address>)
3. after domain is created, edit domain/bin/setDomainEnv.cmd, find
if "%DEBUG_PORT%"=="" (
set DEBUG_PORT=8453
)
change the port# to something new, e.g 2nd domain, set it to 8454, 3rd domain set it to 8455 etc...
While i'm at it, here is how to delete a domain:
1. delete "user-projects/domains/your-domain-folder" (or rename it)
2. go to middleware home (c:\oracle\middleware), in domain-registry.xml, delete your-domain entry
3. oh, remember to delete "user-projects/applications/your-domain-name" folder as well.
Monday, June 17, 2013

Tuesday, June 11, 2013
salesforce.com and Shibboleth SSO
It's an odd subject for me to blog about. My knowledge level of salesforce.com is practically 0; my knowledge level with Shibboleth: 0. I learned this word and the product a few days ago when I had to help diagnose an SSO issue between force.com and a client site.
There are tons of posts sharing their experience on how to make SSO work between force.com and Shibboleth. Everyone shared their success and failure stories. I mostly chewed on these posts and with trial and errors and made it work in our case. I thought I'd share what I learned.
Shibboleth version: 2.3.5.
On force.com site:
Part I
1. check SAML enabled (leave "User Provding Enabled" unchecked), chose SAML version 2.0
2. set issuer as provided by IDP: https://sso.example.edu/idp/shibboleth
3.import the certificate from the client Shibboleth IDP provided
4. select Federation ID
5. select Use ID is attribute, fill in attribute name and format (I collected these from a sample IDP response assertion sample, see the sample assertion below, towards the bottom of the payload)
6. Entity ID: https://saml.salesforce.com
7. HTTP Redirect
save changes
Edit screen dump:

view screen dump:

8. On SSO settings page, click "Download Metadata", save the file and send it to IDP, and tell IDP to update relying-part.xml to point to this file (MetadataProvider/@metadataFile)
Part II
Select Setup menu, search for "my domain", then select "Use the following Authentication Service My SAML IDP"
Part III
IDP side:
That did the trick.
Here is the sample meta data dump:
<?xml version="1.0" encoding="UTF-8"?><md:EntityDescriptor xmlns:md="urn:oasis:names:tc:SAML:2.0:metadata" xmlns:ds="http://www.w3.org/2000/09/xmldsig#" entityID="https://saml.salesforce.com" validUntil="2023-06-11T21:25:53.105Z">
<md:SPSSODescriptor AuthnRequestsSigned="true" WantAssertionsSigned="true" protocolSupportEnumeration="urn:oasis:names:tc:SAML:2.0:protocol">
<md:KeyDescriptor use="signing">
<ds:KeyInfo>
<ds:X509Data>
<ds:X509Certificate>MIIFBzCCA++gAwIBAgIQDJ4ihF+4VYzLxb+qASp7IzANBgkqhkiG9w0BAQUFADCBvDELMAk
GA1UEBhMCVVMxFzAVBgNVBAoTDlZlcmlTaWduLCBJbmMuMR8wHQYDVQQLExZWZXJpU2lnbi
...
xcHB+08lZiJzKwN/yg==</ds:X509Certificate>
</ds:X509Data>
</ds:KeyInfo>
</md:KeyDescriptor>
<md:NameIDFormat>urn:oasis:names:tc:SAML:1.1:nameid-format:unspecified</md:NameIDFormat>
<md:AssertionConsumerService Binding="urn:oasis:names:tc:SAML:2.0:bindings:HTTP-POST" Location="https://test.salesforce.com/?saml=MgoTx78aEPqYOjf4wsNP4y2cWzUwlVn8UjYAqjjrKUbZUNj9Y1hnr9fJpa" index="0" isDefault="true"/>
<md:AttributeConsumingService index="0" isDefault="true">
<md:ServiceName xml:lang="en">Salesforce.com</md:ServiceName>
<md:RequestedAttribute Name="urn:oid:1.3.6.1.4.1.5923.1.1.1.6" NameFormat="urn:oasis:names:tc:SAML:2.0:attrname-format:uri" isRequired="true"/>
</md:AttributeConsumingService>
</md:SPSSODescriptor>
</md:EntityDescriptor>
here is a sample response assertion:
<saml2p:Response xmlns:saml2p="urn:oasis:names:tc:SAML:2.0:protocol" Destination="https://test.salesforce.com" ID="_70d94b9224a1f64d1bc1d08a7e0f82a8" InResponseTo="_2QbMVwlP6T4mfIKpaguiKDq1rvofuyOI2ueT5fZIQgZ9m6lSZGRWjkDAEd5sEc12NjwotQcMb_XPhwTjcxWcMxobH3fduZo8KoINe.8L0XGshPftH8XN1x907ZyfA4VWJ_3.LlbBtovzGixXRAOzLv8i6srSME.ujlR2g6KpU3x6auSu9Dv7kx5f3r_u32dPF0PEZKODHMtxlVXaycGYuMgC2w0s8.g" IssueInstant="2013-06-11T16:03:15.201Z" Version="2.0" xmlns:xs="http://www.w3.org/2001/XMLSchema">
<saml2:Issuer xmlns:saml2="urn:oasis:names:tc:SAML:2.0:assertion" Format="urn:oasis:names:tc:SAML:2.0:nameid-format:entity">https://sso.examle.edu/idp/shibboleth</saml2:Issuer>
<ds:Signature xmlns:ds="http://www.w3.org/2000/09/xmldsig#">
<ds:SignedInfo>
<ds:CanonicalizationMethod Algorithm="http://www.w3.org/2001/10/xml-exc-c14n#"/>
<ds:SignatureMethod Algorithm="http://www.w3.org/2000/09/xmldsig#rsa-sha1"/>
<ds:Reference URI="#_70d94b9224a1f64d1bc1d08a7e0f82a8">
<ds:Transforms>
<ds:Transform Algorithm="http://www.w3.org/2000/09/xmldsig#enveloped-signature"/>
<ds:Transform Algorithm="http://www.w3.org/2001/10/xml-exc-c14n#">
<ec:InclusiveNamespaces xmlns:ec="http://www.w3.org/2001/10/xml-exc-c14n#" PrefixList="xs"/>
</ds:Transform>
</ds:Transforms>
<ds:DigestMethod Algorithm="http://www.w3.org/2000/09/xmldsig#sha1"/>
<ds:DigestValue>papIEukge3hRwbglEkofGy/ybdI=</ds:DigestValue>
</ds:Reference>
</ds:SignedInfo>
<ds:SignatureValue>q7Sdhz8UC46qUE+yycOoQQ2bLorgZ6HJvONokm9aa1bv+bF4MAljS8p7M7aYeyDZnGk+rDyrQzO+ctL0IfjNZimE8dhW1dt1HDS/6cjyK7zKWZMueEHRWbZPs6GYOYHSYWr2DFplngJYbwZQ4CfNp4yCHjOuGoo0I9Tr0P24/V8b3RMNnN5XAK5GPR/nW+nYsCS8UWeMOcRLg+NvjMfVGczL2Z4XfUHT6Odj6ckiEPCQkzRwg26bl//Lz0zMgDN7QtX0BflMLuS09trDHKfblLCtXAakSjBfaythCxpKCvSIUgMk1FlwCRS+15/YYBF+dTGf8mWCCgFJ6ZF+Euz/Kw==</ds:SignatureValue>
<ds:KeyInfo>
<ds:X509Data>
<ds:X509Certificate>MIIDHzCCAgegAwIBAgIUHPSdb4ae0QA3fyeEIe7wKXi2oT0wDQYJKoZIhvcNAQEFBQAwGDEWMBQG
...
ztgLcVw=</ds:X509Certificate>
</ds:X509Data>
</ds:KeyInfo>
</ds:Signature>
<saml2p:Status>
<saml2p:StatusCode Value="urn:oasis:names:tc:SAML:2.0:status:Success"/>
</saml2p:Status>
<saml2:Assertion xmlns:saml2="urn:oasis:names:tc:SAML:2.0:assertion" ID="_09daf40a77318b7f391fa99c5d2829de" IssueInstant="2013-06-11T16:03:15.201Z" Version="2.0" xmlns:xs="http://www.w3.org/2001/XMLSchema">
<saml2:Issuer Format="urn:oasis:names:tc:SAML:2.0:nameid-format:entity">https://sso.examle.edu/idp/shibboleth</saml2:Issuer>
<ds:Signature xmlns:ds="http://www.w3.org/2000/09/xmldsig#">
<ds:SignedInfo>
<ds:CanonicalizationMethod Algorithm="http://www.w3.org/2001/10/xml-exc-c14n#"/>
<ds:SignatureMethod Algorithm="http://www.w3.org/2000/09/xmldsig#rsa-sha1"/>
<ds:Reference URI="#_09daf40a77318b7f391fa99c5d2829de">
<ds:Transforms>
<ds:Transform Algorithm="http://www.w3.org/2000/09/xmldsig#enveloped-signature"/>
<ds:Transform Algorithm="http://www.w3.org/2001/10/xml-exc-c14n#">
<ec:InclusiveNamespaces xmlns:ec="http://www.w3.org/2001/10/xml-exc-c14n#" PrefixList="xs"/>
</ds:Transform>
</ds:Transforms>
<ds:DigestMethod Algorithm="http://www.w3.org/2000/09/xmldsig#sha1"/>
<ds:DigestValue>cJ6IIEUMHXI6f4qAhgnLl5RPqTA=</ds:DigestValue>
</ds:Reference>
</ds:SignedInfo>
<ds:SignatureValue>a1HCaukY6f6WfB65rSt5zDug+GoAiBohujqt5DSnjYBIg5X9VSCoLIop+sqG790h/v1fTuQyeOXCQpuC745sWn8lFNFPqR8SjZqMR2G6JDHjDtOWpgB4zjWcES3i6SAwSlnEL63WUj0vzCuqt6JYyUmg+xKr8kBVUz4MZEch08pKj4qbeao58WD1YXWBUeT6yHPe44YG9FoPHiP+SicQ/Ea4qwOtnogh6oF8aM4tpAcpyNw924uOPcDe5d20suBZ1DgTLM+B6nLWhxH5FDvmsU9TmGOWAQ63fGY+ZYKN+GFsieiYIPbT6XKOYcOwaxtYdZ7hoebhdv5f4sLvHxRjGQ==</ds:SignatureValue>
<ds:KeyInfo>
<ds:X509Data>
<ds:X509Certificate>MIIDHzCCAgegAwIBAgIUHPSdb4ae0QA3fyeEIe7wKXi2oT0wDQYJKoZIhvcNAQEFBQAwGDEWMBQG
...
ztgLcVw=</ds:X509Certificate>
</ds:X509Data>
</ds:KeyInfo>
</ds:Signature>
<saml2:Subject>
<saml2:NameID Format="urn:oasis:names:tc:SAML:2.0:nameid-format:persistent" NameQualifier="https://sso.examle.edu/idp/shibboleth">4nKARGsfororZJ89y5wDMkZJuE4=</saml2:NameID>
<saml2:SubjectConfirmation Method="urn:oasis:names:tc:SAML:2.0:cm:bearer">
<saml2:SubjectConfirmationData Address="10.25.181.45" InResponseTo="_2QbMVwlP6T4mfIKpaguiKDq1rvofuyOI2ueT5fZIQgZ9m6lSZGRWjkDAEd5sEc12NjwotQcMb_XPhwTjcxWcMxobH3fduZo8KoINe.8L0XGshPftH8XN1x907ZyfA4VWJ_3.LlbBtovzGixXRAOzLv8i6srSME.ujlR2g6KpU3x6auSu9Dv7kx5f3r_u32dPF0PEZKODHMtxlVXaycGYuMgC2w0s8.g" NotOnOrAfter="2013-06-11T16:08:15.201Z" Recipient="https://test.salesforce.com"/>
</saml2:SubjectConfirmation>
</saml2:Subject>
<saml2:Conditions NotBefore="2013-06-11T16:03:15.201Z" NotOnOrAfter="2013-06-11T16:08:15.201Z">
<saml2:AudienceRestriction>
<saml2:Audience>https://saml.salesforce.com</saml2:Audience>
</saml2:AudienceRestriction>
</saml2:Conditions>
<saml2:AuthnStatement AuthnInstant="2013-06-11T16:03:14.850Z" SessionIndex="7143fd8ba813f44fa9fb11512f50175b00ab09b21b7ca7d442164ebbda6b8281">
<saml2:SubjectLocality Address="10.25.181.45"/>
<saml2:AuthnContext>
<saml2:AuthnContextClassRef>urn:oasis:names:tc:SAML:2.0:ac:classes:PasswordProtectedTransport</saml2:AuthnContextClassRef>
</saml2:AuthnContext>
</saml2:AuthnStatement>
<saml2:AttributeStatement>
<saml2:Attribute FriendlyName="eduPersonPrincipalName" Name="urn:oid:1.3.6.1.4.1.5923.1.1.1.6" NameFormat="urn:oasis:names:tc:SAML:2.0:attrname-format:uri">
<saml2:AttributeValue>john.doe@examle.edu</saml2:AttributeValue>
</saml2:Attribute>
</saml2:AttributeStatement>
</saml2:Assertion>
</saml2p:Response>
There are tons of posts sharing their experience on how to make SSO work between force.com and Shibboleth. Everyone shared their success and failure stories. I mostly chewed on these posts and with trial and errors and made it work in our case. I thought I'd share what I learned.
Shibboleth version: 2.3.5.
On force.com site:
Part I
1. check SAML enabled (leave "User Provding Enabled" unchecked), chose SAML version 2.0
2. set issuer as provided by IDP: https://sso.example.edu/idp/shibboleth
3.import the certificate from the client Shibboleth IDP provided
4. select Federation ID
5. select Use ID is attribute, fill in attribute name and format (I collected these from a sample IDP response assertion sample, see the sample assertion below, towards the bottom of the payload)
6. Entity ID: https://saml.salesforce.com
7. HTTP Redirect
save changes
Edit screen dump:
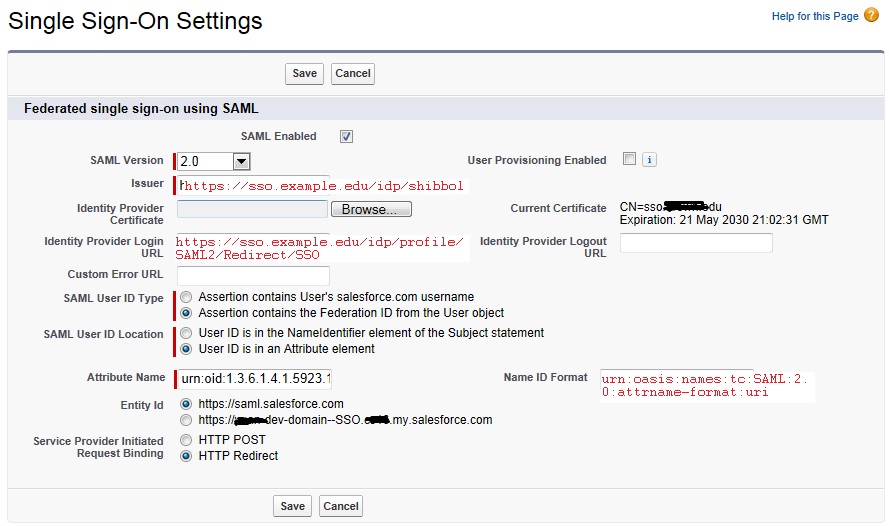
view screen dump:

Part II
Select Setup menu, search for "my domain", then select "Use the following Authentication Service My SAML IDP"
Part III
IDP side:
- update relying-part.xml (as in step 8 above)
- set encryption to OFF
- set sign signature to ON
That did the trick.
Here is the sample meta data dump:
<?xml version="1.0" encoding="UTF-8"?><md:EntityDescriptor xmlns:md="urn:oasis:names:tc:SAML:2.0:metadata" xmlns:ds="http://www.w3.org/2000/09/xmldsig#" entityID="https://saml.salesforce.com" validUntil="2023-06-11T21:25:53.105Z">
<md:SPSSODescriptor AuthnRequestsSigned="true" WantAssertionsSigned="true" protocolSupportEnumeration="urn:oasis:names:tc:SAML:2.0:protocol">
<md:KeyDescriptor use="signing">
<ds:KeyInfo>
<ds:X509Data>
<ds:X509Certificate>MIIFBzCCA++gAwIBAgIQDJ4ihF+4VYzLxb+qASp7IzANBgkqhkiG9w0BAQUFADCBvDELMAk
GA1UEBhMCVVMxFzAVBgNVBAoTDlZlcmlTaWduLCBJbmMuMR8wHQYDVQQLExZWZXJpU2lnbi
...
xcHB+08lZiJzKwN/yg==</ds:X509Certificate>
</ds:X509Data>
</ds:KeyInfo>
</md:KeyDescriptor>
<md:NameIDFormat>urn:oasis:names:tc:SAML:1.1:nameid-format:unspecified</md:NameIDFormat>
<md:AssertionConsumerService Binding="urn:oasis:names:tc:SAML:2.0:bindings:HTTP-POST" Location="https://test.salesforce.com/?saml=MgoTx78aEPqYOjf4wsNP4y2cWzUwlVn8UjYAqjjrKUbZUNj9Y1hnr9fJpa" index="0" isDefault="true"/>
<md:AttributeConsumingService index="0" isDefault="true">
<md:ServiceName xml:lang="en">Salesforce.com</md:ServiceName>
<md:RequestedAttribute Name="urn:oid:1.3.6.1.4.1.5923.1.1.1.6" NameFormat="urn:oasis:names:tc:SAML:2.0:attrname-format:uri" isRequired="true"/>
</md:AttributeConsumingService>
</md:SPSSODescriptor>
</md:EntityDescriptor>
here is a sample response assertion:
<saml2p:Response xmlns:saml2p="urn:oasis:names:tc:SAML:2.0:protocol" Destination="https://test.salesforce.com" ID="_70d94b9224a1f64d1bc1d08a7e0f82a8" InResponseTo="_2QbMVwlP6T4mfIKpaguiKDq1rvofuyOI2ueT5fZIQgZ9m6lSZGRWjkDAEd5sEc12NjwotQcMb_XPhwTjcxWcMxobH3fduZo8KoINe.8L0XGshPftH8XN1x907ZyfA4VWJ_3.LlbBtovzGixXRAOzLv8i6srSME.ujlR2g6KpU3x6auSu9Dv7kx5f3r_u32dPF0PEZKODHMtxlVXaycGYuMgC2w0s8.g" IssueInstant="2013-06-11T16:03:15.201Z" Version="2.0" xmlns:xs="http://www.w3.org/2001/XMLSchema">
<saml2:Issuer xmlns:saml2="urn:oasis:names:tc:SAML:2.0:assertion" Format="urn:oasis:names:tc:SAML:2.0:nameid-format:entity">https://sso.examle.edu/idp/shibboleth</saml2:Issuer>
<ds:Signature xmlns:ds="http://www.w3.org/2000/09/xmldsig#">
<ds:SignedInfo>
<ds:CanonicalizationMethod Algorithm="http://www.w3.org/2001/10/xml-exc-c14n#"/>
<ds:SignatureMethod Algorithm="http://www.w3.org/2000/09/xmldsig#rsa-sha1"/>
<ds:Reference URI="#_70d94b9224a1f64d1bc1d08a7e0f82a8">
<ds:Transforms>
<ds:Transform Algorithm="http://www.w3.org/2000/09/xmldsig#enveloped-signature"/>
<ds:Transform Algorithm="http://www.w3.org/2001/10/xml-exc-c14n#">
<ec:InclusiveNamespaces xmlns:ec="http://www.w3.org/2001/10/xml-exc-c14n#" PrefixList="xs"/>
</ds:Transform>
</ds:Transforms>
<ds:DigestMethod Algorithm="http://www.w3.org/2000/09/xmldsig#sha1"/>
<ds:DigestValue>papIEukge3hRwbglEkofGy/ybdI=</ds:DigestValue>
</ds:Reference>
</ds:SignedInfo>
<ds:SignatureValue>q7Sdhz8UC46qUE+yycOoQQ2bLorgZ6HJvONokm9aa1bv+bF4MAljS8p7M7aYeyDZnGk+rDyrQzO+ctL0IfjNZimE8dhW1dt1HDS/6cjyK7zKWZMueEHRWbZPs6GYOYHSYWr2DFplngJYbwZQ4CfNp4yCHjOuGoo0I9Tr0P24/V8b3RMNnN5XAK5GPR/nW+nYsCS8UWeMOcRLg+NvjMfVGczL2Z4XfUHT6Odj6ckiEPCQkzRwg26bl//Lz0zMgDN7QtX0BflMLuS09trDHKfblLCtXAakSjBfaythCxpKCvSIUgMk1FlwCRS+15/YYBF+dTGf8mWCCgFJ6ZF+Euz/Kw==</ds:SignatureValue>
<ds:KeyInfo>
<ds:X509Data>
<ds:X509Certificate>MIIDHzCCAgegAwIBAgIUHPSdb4ae0QA3fyeEIe7wKXi2oT0wDQYJKoZIhvcNAQEFBQAwGDEWMBQG
...
ztgLcVw=</ds:X509Certificate>
</ds:X509Data>
</ds:KeyInfo>
</ds:Signature>
<saml2p:Status>
<saml2p:StatusCode Value="urn:oasis:names:tc:SAML:2.0:status:Success"/>
</saml2p:Status>
<saml2:Assertion xmlns:saml2="urn:oasis:names:tc:SAML:2.0:assertion" ID="_09daf40a77318b7f391fa99c5d2829de" IssueInstant="2013-06-11T16:03:15.201Z" Version="2.0" xmlns:xs="http://www.w3.org/2001/XMLSchema">
<saml2:Issuer Format="urn:oasis:names:tc:SAML:2.0:nameid-format:entity">https://sso.examle.edu/idp/shibboleth</saml2:Issuer>
<ds:Signature xmlns:ds="http://www.w3.org/2000/09/xmldsig#">
<ds:SignedInfo>
<ds:CanonicalizationMethod Algorithm="http://www.w3.org/2001/10/xml-exc-c14n#"/>
<ds:SignatureMethod Algorithm="http://www.w3.org/2000/09/xmldsig#rsa-sha1"/>
<ds:Reference URI="#_09daf40a77318b7f391fa99c5d2829de">
<ds:Transforms>
<ds:Transform Algorithm="http://www.w3.org/2000/09/xmldsig#enveloped-signature"/>
<ds:Transform Algorithm="http://www.w3.org/2001/10/xml-exc-c14n#">
<ec:InclusiveNamespaces xmlns:ec="http://www.w3.org/2001/10/xml-exc-c14n#" PrefixList="xs"/>
</ds:Transform>
</ds:Transforms>
<ds:DigestMethod Algorithm="http://www.w3.org/2000/09/xmldsig#sha1"/>
<ds:DigestValue>cJ6IIEUMHXI6f4qAhgnLl5RPqTA=</ds:DigestValue>
</ds:Reference>
</ds:SignedInfo>
<ds:SignatureValue>a1HCaukY6f6WfB65rSt5zDug+GoAiBohujqt5DSnjYBIg5X9VSCoLIop+sqG790h/v1fTuQyeOXCQpuC745sWn8lFNFPqR8SjZqMR2G6JDHjDtOWpgB4zjWcES3i6SAwSlnEL63WUj0vzCuqt6JYyUmg+xKr8kBVUz4MZEch08pKj4qbeao58WD1YXWBUeT6yHPe44YG9FoPHiP+SicQ/Ea4qwOtnogh6oF8aM4tpAcpyNw924uOPcDe5d20suBZ1DgTLM+B6nLWhxH5FDvmsU9TmGOWAQ63fGY+ZYKN+GFsieiYIPbT6XKOYcOwaxtYdZ7hoebhdv5f4sLvHxRjGQ==</ds:SignatureValue>
<ds:KeyInfo>
<ds:X509Data>
<ds:X509Certificate>MIIDHzCCAgegAwIBAgIUHPSdb4ae0QA3fyeEIe7wKXi2oT0wDQYJKoZIhvcNAQEFBQAwGDEWMBQG
...
ztgLcVw=</ds:X509Certificate>
</ds:X509Data>
</ds:KeyInfo>
</ds:Signature>
<saml2:Subject>
<saml2:NameID Format="urn:oasis:names:tc:SAML:2.0:nameid-format:persistent" NameQualifier="https://sso.examle.edu/idp/shibboleth">4nKARGsfororZJ89y5wDMkZJuE4=</saml2:NameID>
<saml2:SubjectConfirmation Method="urn:oasis:names:tc:SAML:2.0:cm:bearer">
<saml2:SubjectConfirmationData Address="10.25.181.45" InResponseTo="_2QbMVwlP6T4mfIKpaguiKDq1rvofuyOI2ueT5fZIQgZ9m6lSZGRWjkDAEd5sEc12NjwotQcMb_XPhwTjcxWcMxobH3fduZo8KoINe.8L0XGshPftH8XN1x907ZyfA4VWJ_3.LlbBtovzGixXRAOzLv8i6srSME.ujlR2g6KpU3x6auSu9Dv7kx5f3r_u32dPF0PEZKODHMtxlVXaycGYuMgC2w0s8.g" NotOnOrAfter="2013-06-11T16:08:15.201Z" Recipient="https://test.salesforce.com"/>
</saml2:SubjectConfirmation>
</saml2:Subject>
<saml2:Conditions NotBefore="2013-06-11T16:03:15.201Z" NotOnOrAfter="2013-06-11T16:08:15.201Z">
<saml2:AudienceRestriction>
<saml2:Audience>https://saml.salesforce.com</saml2:Audience>
</saml2:AudienceRestriction>
</saml2:Conditions>
<saml2:AuthnStatement AuthnInstant="2013-06-11T16:03:14.850Z" SessionIndex="7143fd8ba813f44fa9fb11512f50175b00ab09b21b7ca7d442164ebbda6b8281">
<saml2:SubjectLocality Address="10.25.181.45"/>
<saml2:AuthnContext>
<saml2:AuthnContextClassRef>urn:oasis:names:tc:SAML:2.0:ac:classes:PasswordProtectedTransport</saml2:AuthnContextClassRef>
</saml2:AuthnContext>
</saml2:AuthnStatement>
<saml2:AttributeStatement>
<saml2:Attribute FriendlyName="eduPersonPrincipalName" Name="urn:oid:1.3.6.1.4.1.5923.1.1.1.6" NameFormat="urn:oasis:names:tc:SAML:2.0:attrname-format:uri">
<saml2:AttributeValue>john.doe@examle.edu</saml2:AttributeValue>
</saml2:Attribute>
</saml2:AttributeStatement>
</saml2:Assertion>
</saml2p:Response>
Friday, May 31, 2013
Configure OSB Business Service to Call an External HTTPS Service
This writing shows the specific steps on how
to configure an OSB business service to make an external HTTPS service call.


1.
Let’s start with the HTTPS site that you need
call from OSB. You can retrieve the certificate(s) of the web site with
Firefox. Follow the 7 steps (red marked circles on the screen shots) listed in the two screen shots (I used a bank site
as an example)
Remember to repeat the 7 steps for each of
certificate in the hierarchy in the 2nd screen shot. After these,
you should have 3 certificate files. One for the site, one is intermediate CA,
and finally a root CA.
Note:
·
You can harvest certificate files from IE or
Chrome, the exported file maybe in “.cer” format. Although you can import those
“.cer” file into the key store successfully, I was told that it may not work.
So you need to make sure your certificate file output in PEM format!


2.
Import certificates into DemoTrust (or you designed trust store) store
keytool -import -keystore
C:\Oracle\Middleware\wlserver_10.3\server\lib\DemoTrust.jks -storepass DemoTrustKeyStorePassPhrase -trustcacertificates
-file certX.crt -alias certX
where “certX.crt” is the certificate file.
Note:
·
There are two key stores in WSL.
The “trust key store” is for storing external certificates that you
“trust”, so WSL can talk to them.
The
“identity key store” keeps both public/private key that identifies you, so
external parties can identify you.
You can find your key store locations from
“Environment->Servers”, click on your server, for example, osb_server1 in
the sample screen below:

3.
What if the certificate is a wildcard certificate
like *.example.com?
WLS doesn’t support wildcard certificate out of box. For WLS
version before 10.3.6, you need to apply a patch. For 10.3.6, you need to
follow this link http://docs.oracle.com/cd/E23943_01/web.1111/e13707/ssl.htm#CHDIEIEE
Steps
summary: login to WLS console, go to environment, servers, then OSB server,
click on configuration, then SSL, then advanced, set custom host verifier, then
set the custom verifier class to “weblogic.security.utils.SSLWLSWildcardHostnameVerifier”.
4. If
the target service also require WS-name token, then you need to attach the wss-user-token-client-policy
to the business service. Check the “security” tab, and make sure you have the
matching create “basic.credentials” by default. Or
you can use “overrides” to set a different credential, such as
“idm.credentials”, technically you can name it anything, you need to make sure
“idm.credentials” exits on “em” (under "weblogic domain", your domain name, right click, then select Security, Credentials) console just like “basic.crentials”.
Thursday, May 30, 2013
The "cool" way to do base64 decode with OSB 11.1.1.6
Two years ago, i did a post on how to use proxy java callout to base64 decode with OSB 11.1.1.3 http://yuanmengblog.blogspot.com/2011/04/base64-decoder-for-osb.html.
Now i have 11.1.1.6. Obviously, oracle has moved those jar files around, so you will have to find out where the xerces jar file is if you want to do the same thing in 11.1.1.6.
Well, a colleague brought to my attention something I thought was very cool: using XSLT java call to do the base64 decode. Then you don't need to do the proxy java callout, therefore, saving the trouble of uploading some custom jar file. That sounded very cool, so i decided to give it a shot.
For that we need to resolve two issues. 1. what's the Oracle xslt processor's syntax for java call (it appears to me the XSLT java call syntax varies among different xslt processors). 2. What is the new base64 decoder class in 11.1.1.6. The xslt code below answers both of these questions:
<xsl:stylesheet version="1.0"
xmlns:xsl="http://www.w3.org/1999/XSL/Transform"
xmlns:b64="http://www.oracle.com/XSL/Transform/java/weblogic.apache.xerces.impl.dv.util.Base64"
>
<xsl:template match="/">
<foo>
<xsl:value-of select="b64:decode('d2xzdXNlcjp3ZWxjb21lMQ==')"/>
</foo>
</xsl:template>
</xsl:stylesheet>
plug it into your proxy assignment activity, then you will get an output of
<foo xmlns:b64="http://www.oracle.com/XSL/Transform/java/weblogic.apache.xerces.impl.dv.util.Base64">wlsuser:welcome1</foo>
Keep in mind, directly referencing an undocumented/unsupported oracle class "weblogic.apache.xerces.impl.dv.util.Base64" is a tricky business, proceed at your own risk. currently, this class is inside "com.bea.core.apache_1.3.0.1.jar" under "C:\Oracle\Middleware\Oracle_OSB1\modules" for my 11.1.1.6 install. If oracle decides to change that, then you need to update your xslt as well.
testing on the command line (in my environment):
set classpath=C:\Oracle\Middleware\oracle_common\modules\oracle.xdk_11.1.0\xmlparserv2.jar;c:\Oracle\Middleware\Oracle_OSB1\modules\com.bea.core.apache_1.3.0.1.jar;
first jar is for oraxsl, 2nd jar is for base64 decoding:
java oracle.xml.parser.v2.oraxsl input.xml test.xslt
Now i have 11.1.1.6. Obviously, oracle has moved those jar files around, so you will have to find out where the xerces jar file is if you want to do the same thing in 11.1.1.6.
Well, a colleague brought to my attention something I thought was very cool: using XSLT java call to do the base64 decode. Then you don't need to do the proxy java callout, therefore, saving the trouble of uploading some custom jar file. That sounded very cool, so i decided to give it a shot.
For that we need to resolve two issues. 1. what's the Oracle xslt processor's syntax for java call (it appears to me the XSLT java call syntax varies among different xslt processors). 2. What is the new base64 decoder class in 11.1.1.6. The xslt code below answers both of these questions:
<xsl:stylesheet version="1.0"
xmlns:xsl="http://www.w3.org/1999/XSL/Transform"
xmlns:b64="http://www.oracle.com/XSL/Transform/java/weblogic.apache.xerces.impl.dv.util.Base64"
>
<xsl:template match="/">
<foo>
<xsl:value-of select="b64:decode('d2xzdXNlcjp3ZWxjb21lMQ==')"/>
</foo>
</xsl:template>
</xsl:stylesheet>
plug it into your proxy assignment activity, then you will get an output of
<foo xmlns:b64="http://www.oracle.com/XSL/Transform/java/weblogic.apache.xerces.impl.dv.util.Base64">wlsuser:welcome1</foo>
Keep in mind, directly referencing an undocumented/unsupported oracle class "weblogic.apache.xerces.impl.dv.util.Base64" is a tricky business, proceed at your own risk. currently, this class is inside "com.bea.core.apache_1.3.0.1.jar" under "C:\Oracle\Middleware\Oracle_OSB1\modules" for my 11.1.1.6 install. If oracle decides to change that, then you need to update your xslt as well.
testing on the command line (in my environment):
set classpath=C:\Oracle\Middleware\oracle_common\modules\oracle.xdk_11.1.0\xmlparserv2.jar;c:\Oracle\Middleware\Oracle_OSB1\modules\com.bea.core.apache_1.3.0.1.jar;
first jar is for oraxsl, 2nd jar is for base64 decoding:
java oracle.xml.parser.v2.oraxsl input.xml test.xslt
Retrieve and pass around http Authorization header with OSB
It never ceases to amaze me how i stumble on some "new" features with OSB. This time it's to retrieve and pass around http Authorization header with OSB.
I thought it was a long closed chapter that OSB strips off the http basic authentication header before the pipeline is invoked. Well, it's still true, except a colleague showed me there is a trick to make OSB show the http Authorization header!
The trick is to add -Dcom.bea.wli.sb.transports.http.GetHttpAuthorizationHeaderAllowed=true to the OSB start up command. Once you do that, (you still need to check "Get All Headers" on the proxy) you can access the authentication header like regular http user header.
$inbound/ctx:transport/ctx:request/tp:headers/tp:user-header/@value
The above expression worked for me, because i have only one user-header. i would assume you need to do something like below if you have more than one user-header.
$inbound/ctx:transport/ctx:request/tp:headers/tp:user-header[@name='Authorization']/@value
In my test case, i'm doing a bit more than just access it on the incoming proxy. I have 3 parts, Proxy1, a biz svc, and Proxy2. I want to pass the authorization header from proxy1 to proxy2 via the biz svc.
The screen below shows Proxy1 uses route to call the biz service, you need to set transport headers for "Outbound Request", check "Pass all Headers through pipeline". That should pass the authorization header on. In my case, i also tested with an additional custom header "aTestHeader" as shown in the screen shot.
 One important note, on the biz service, normally it would require enabling "basic" authentication with a "Pass through" service account. However, if you added that magic start up option, then it doesn't matter what the biz service setting is. Because you are passing the authorization header explicitly. Additionally, if you want to see the authorization header in proxy2, you still need to check "pass all headers through pipeline".
On the biz service, that "pass through" service account will help you, if you don't use the magic start up option. In that case, the authorization header will not be explicitly accessible in the proxy, but the biz service will pass it on behind the scene. So if Proxy2 has enabled basic authentication, then the authorization header will be handed over to Proxy2 (behind the scene), so the authentication on proxy2 would succeed.
I thought it was a long closed chapter that OSB strips off the http basic authentication header before the pipeline is invoked. Well, it's still true, except a colleague showed me there is a trick to make OSB show the http Authorization header!
The trick is to add -Dcom.bea.wli.sb.transports.http.GetHttpAuthorizationHeaderAllowed=true to the OSB start up command. Once you do that, (you still need to check "Get All Headers" on the proxy) you can access the authentication header like regular http user header.
$inbound/ctx:transport/ctx:request/tp:headers/tp:user-header/@value
The above expression worked for me, because i have only one user-header. i would assume you need to do something like below if you have more than one user-header.
$inbound/ctx:transport/ctx:request/tp:headers/tp:user-header[@name='Authorization']/@value
In my test case, i'm doing a bit more than just access it on the incoming proxy. I have 3 parts, Proxy1, a biz svc, and Proxy2. I want to pass the authorization header from proxy1 to proxy2 via the biz svc.
The screen below shows Proxy1 uses route to call the biz service, you need to set transport headers for "Outbound Request", check "Pass all Headers through pipeline". That should pass the authorization header on. In my case, i also tested with an additional custom header "aTestHeader" as shown in the screen shot.

On the biz service, that "pass through" service account will help you, if you don't use the magic start up option. In that case, the authorization header will not be explicitly accessible in the proxy, but the biz service will pass it on behind the scene. So if Proxy2 has enabled basic authentication, then the authorization header will be handed over to Proxy2 (behind the scene), so the authentication on proxy2 would succeed.
Wednesday, May 29, 2013
maven/ant/java export osb config jar from the source files
Maven and ant call eclipse plugin "org.eclipse.equinox.launcher" to export the osb config jar file.
Our project default uses OEPE 11.1.1.4. But I have OEPE 11.1.1.6. I had to adjust a few lines to make it work for me. Here is my final result:
<execution>
<id>compileOSB</id>
<phase>package</phase>
<goals>
<goal>run</goal>
</goals>
<configuration>
<target name="makeosbjar">
<path id="library.osb">
<fileset dir="${OSB_HOME}/modules">
<include name="com.bea.common.configfwk_1.6.0.0.jar" />
<include name="com.bea.core.xml.xmlbeans_2.2.0.0_2-5-1.jar" />
</fileset>
<fileset dir="${MW_HOME}/wlserver_10.3/server/lib">
<include name="weblogic.jar" />
</fileset>
<fileset dir="${OSB_HOME}/lib">
<include name="alsb.jar" />
</fileset>
</path>
<java dir="${OEPE_PLUGINS_HOME}/.." jar="${OEPE_PLUGINS_HOME}/org.eclipse.equinox.launcher_1.2.0.v20110502.jar" classpathref="library.osb" fork="true" failonerror="true" maxmemory="768m">
<!--jvmarg line="-d64" /-->
<jvmarg line="-XX:MaxPermSize=256m" />
<arg line="-application com.bea.alsb.core.ConfigExport" />
<arg line="-data ${project.build.directory}/classes" />
<arg line="-configProject MyOSBConfiguration" />
<arg line="-configSubProjects ${osb.config.project}" />
<arg line="-configJar ${project.build.directory}/${project.artifactId}-${project.version}.jar" />
<sysproperty key="weblogic.home" value="${MW_HOME}/wlserver_10.3" />
<sysproperty key="osb.home" value="${OSB_HOME}" />
<sysproperty key="middleware.home" value="${MW_HOME}"/>
</java>
</target>
</configuration>
</execution>
i have highlighted the changes i made. If you have a different OEPE version, you need to find your corresponding jars for these:
com.bea.common.configfwk
com.bea.core.xml.xmlbeans
org.eclipse.equinox.launcher_1.2.0.v20110502.jar
==== post note:
Using java directly:
set classpath=C:\Oracle\Middleware\Oracle_OSB1\modules\com.bea.common.configfwk_1.6.0.0.jar;C:\Oracle\Middleware\Oracle_OSB1\modules\com.bea.core.xml.xmlbeans_2.2.0.0_2-5-1.jar;C:\Oracle\Middleware\wlserver_10.3\server\lib\weblogic.jar;C:\Oracle\Middleware\Oracle_OSB1\lib\alsb.jar
set jvmarg=-XX:MaxPermSize=256m -Xmx768m -Dweblogic.home=C:\Oracle\Middleware/wlserver_10.3 -Dosb.home=C:\Oracle\Middleware\Oracle_OSB1 -Dmiddleware.home=C:\Oracle\Middleware
set java_options=-application com.bea.alsb.core.ConfigExport -data D:\proj\osbproj1 -configProject "OSB Configuration" -configSubProjects "OSBProject" -configJar "sbconfig.jar"
java %jvmarg% -jar C:\Oracle\Middleware\oepe11118\plugins\org.eclipse.equinox.launcher_1.2.0.v20110502.jar %java_options%
Here is a full expansion of java command line:
java -XX:MaxPermSize=256m -Xmx768m -Dweblogic.home=C:\Oracle\Middleware/wlserver_10.3 -Dosb.home=C:\Oracle\Middleware\Oracle_OSB1 -Dmiddleware.home=C:\Oracle\Middleware -classpath C:\Oracle\Middleware\Oracle_OSB1\modules\com.bea.common.configfwk_1.6.0.0.jar;C:\Oracle\Middleware\Oracle_OSB1\modules\com.bea.core.xml.xmlbeans_2.2.0.0_2-5-1.jar;C:\Oracle\Middleware\wlserver_10.3\server\lib\weblogic.jar;C:\Oracle\Middleware\Oracle_OSB1\lib\alsb.jar -jar C:\Oracle\Middleware\oepe11118\plugins\org.eclipse.equinox.launcher_1.2.0.v20110502.jar -application com.bea.alsb.core.ConfigExport -data D:\proj\osbproj1 -configProject "OSB Configuration" -configSubProjects OSBProject -configJar sbconfig.jar
keep in mind, "-data D:\proj\osbproj1" points to source directory of your OSB Configuration and OSB project. In this case, i have an "OSB Configuration" project, and an "OSBProject".
Our project default uses OEPE 11.1.1.4. But I have OEPE 11.1.1.6. I had to adjust a few lines to make it work for me. Here is my final result:
<execution>
<id>compileOSB</id>
<phase>package</phase>
<goals>
<goal>run</goal>
</goals>
<configuration>
<target name="makeosbjar">
<path id="library.osb">
<fileset dir="${OSB_HOME}/modules">
<include name="com.bea.common.configfwk_1.6.0.0.jar" />
<include name="com.bea.core.xml.xmlbeans_2.2.0.0_2-5-1.jar" />
</fileset>
<fileset dir="${MW_HOME}/wlserver_10.3/server/lib">
<include name="weblogic.jar" />
</fileset>
<fileset dir="${OSB_HOME}/lib">
<include name="alsb.jar" />
</fileset>
</path>
<java dir="${OEPE_PLUGINS_HOME}/.." jar="${OEPE_PLUGINS_HOME}/org.eclipse.equinox.launcher_1.2.0.v20110502.jar" classpathref="library.osb" fork="true" failonerror="true" maxmemory="768m">
<!--jvmarg line="-d64" /-->
<jvmarg line="-XX:MaxPermSize=256m" />
<arg line="-application com.bea.alsb.core.ConfigExport" />
<arg line="-data ${project.build.directory}/classes" />
<arg line="-configProject MyOSBConfiguration" />
<arg line="-configSubProjects ${osb.config.project}" />
<arg line="-configJar ${project.build.directory}/${project.artifactId}-${project.version}.jar" />
<sysproperty key="weblogic.home" value="${MW_HOME}/wlserver_10.3" />
<sysproperty key="osb.home" value="${OSB_HOME}" />
<sysproperty key="middleware.home" value="${MW_HOME}"/>
</java>
</target>
</configuration>
</execution>
i have highlighted the changes i made. If you have a different OEPE version, you need to find your corresponding jars for these:
com.bea.common.configfwk
com.bea.core.xml.xmlbeans
org.eclipse.equinox.launcher_1.2.0.v20110502.jar
Additionally, I have Java 1.6.0_31. Although it's 64 bit version, it doesn't support "-d64" option. So i took that out. However, the most important parameter i added in is <sysproperty key="middleware.home" value="${MW_HOME}"/>. That resolved that perplexing error message:
...
Caused by: java.lang.NoClassDefFoundError: org/apache/xmlbeans/SchemaTypeLoader
...
...
Caused by: java.lang.NoClassDefFoundError: org/apache/xmlbeans/SchemaTypeLoader
...
==== post note:
Using java directly:
set classpath=C:\Oracle\Middleware\Oracle_OSB1\modules\com.bea.common.configfwk_1.6.0.0.jar;C:\Oracle\Middleware\Oracle_OSB1\modules\com.bea.core.xml.xmlbeans_2.2.0.0_2-5-1.jar;C:\Oracle\Middleware\wlserver_10.3\server\lib\weblogic.jar;C:\Oracle\Middleware\Oracle_OSB1\lib\alsb.jar
set jvmarg=-XX:MaxPermSize=256m -Xmx768m -Dweblogic.home=C:\Oracle\Middleware/wlserver_10.3 -Dosb.home=C:\Oracle\Middleware\Oracle_OSB1 -Dmiddleware.home=C:\Oracle\Middleware
set java_options=-application com.bea.alsb.core.ConfigExport -data D:\proj\osbproj1 -configProject "OSB Configuration" -configSubProjects "OSBProject" -configJar "sbconfig.jar"
java %jvmarg% -jar C:\Oracle\Middleware\oepe11118\plugins\org.eclipse.equinox.launcher_1.2.0.v20110502.jar %java_options%
Here is a full expansion of java command line:
java -XX:MaxPermSize=256m -Xmx768m -Dweblogic.home=C:\Oracle\Middleware/wlserver_10.3 -Dosb.home=C:\Oracle\Middleware\Oracle_OSB1 -Dmiddleware.home=C:\Oracle\Middleware -classpath C:\Oracle\Middleware\Oracle_OSB1\modules\com.bea.common.configfwk_1.6.0.0.jar;C:\Oracle\Middleware\Oracle_OSB1\modules\com.bea.core.xml.xmlbeans_2.2.0.0_2-5-1.jar;C:\Oracle\Middleware\wlserver_10.3\server\lib\weblogic.jar;C:\Oracle\Middleware\Oracle_OSB1\lib\alsb.jar -jar C:\Oracle\Middleware\oepe11118\plugins\org.eclipse.equinox.launcher_1.2.0.v20110502.jar -application com.bea.alsb.core.ConfigExport -data D:\proj\osbproj1 -configProject "OSB Configuration" -configSubProjects OSBProject -configJar sbconfig.jar
keep in mind, "-data D:\proj\osbproj1" points to source directory of your OSB Configuration and OSB project. In this case, i have an "OSB Configuration" project, and an "OSBProject".
Wednesday, May 22, 2013
Java Web Service Resource Injection Fails on JMS Connection Factory When JMS Server Migrates
Here is the problem:
We have a clustered Weblogic environment. Let's say two managed servers M1 and M2. We have JMS server that needs be migrated among the managed servers. The JMS server is initially targeted to M1.
We have web services running on the cluster. One service publishes messages to the JMS server. This web service uses Java resource injection for the JMS connection factory like:
@Resource(mappedName="ll.jmsprovider.XAConnectionFactory")
private ConnectionFactory connectionFactory;
We have a clustered Weblogic environment. Let's say two managed servers M1 and M2. We have JMS server that needs be migrated among the managed servers. The JMS server is initially targeted to M1.
We have web services running on the cluster. One service publishes messages to the JMS server. This web service uses Java resource injection for the JMS connection factory like:
@Resource(mappedName="ll.jmsprovider.XAConnectionFactory")
private ConnectionFactory connectionFactory;
When the service is deployed to the cluster. "connectionFactory" is properly initialized, everything is fine. Even when we shutdown M1, the JMS resource is migrated to M2, the "connectionFactory" still works fine on M2. We can still publish messages.
The problem is when we bring back up M1, and shutdown M2. That's when "connectionFactory" doesn't work anymore. I suspect there might be some configurations on migration policy to make "connectionFactory" work seamlessly when the migration happens. But I don't know how. So my kludge is to recreate the "connectionFactory" on the fly. Here is the entire "hack":
package pubmsg;
import javax.annotation.Resource;
import javax.jms.Connection;
import javax.jms.ConnectionFactory;
import javax.jms.JMSException;
import javax.jms.MessageProducer;
import javax.jms.Queue;
import javax.jms.Session;
import javax.jms.TextMessage;
import javax.jws.Oneway;
import javax.jws.WebMethod;
import javax.jws.WebService;
import javax.naming.InitialContext;
import javax.naming.NamingException;
import javax.transaction.SystemException;
@WebService(targetNamespace = "http://pubmsg.org/")
public class msgSender {
@Resource(mappedName="ll.jmsprovider.XAConnectionFactory")
private ConnectionFactory connectionFactory;
@Resource(mappedName="ll.jms.partner.enroll.queue")
private javax.jms.Queue queue;
public msgSender() {
super();
}
@WebMethod
@Oneway
public void sendMessage(String msg) {
Connection conn = null;
try {
try {
conn = connectionFactory.createConnection(); // my "hack"
}
catch (Exception e) {
InitialContext ctx = new InitialContext();
connectionFactory = (ConnectionFactory) ctx.lookup("ll.jmsprovider.XAConnectionFactory");
conn = connectionFactory.createConnection();
queue = (Queue) ctx.lookup("ll.jms.partner.enroll.queue");
}
Session session = conn.createSession(false, Session.CLIENT_ACKNOWLEDGE);
TextMessage message = session.createTextMessage(msg);
MessageProducer messageProducer = session.createProducer(queue);
messageProducer.send(message);
}
catch (NamingException e) {}
catch (JMSException e) {}
finally {
if (conn!=null) {
try {
conn.close();
} catch (JMSException e) {}
}
}
}
}
Not the most elegant solution. Oh, well, i need to move on...
Ironically, the purpose of this blog is keep track what i did and how i did it. But it has been several weeks since I worked on it, I already forgot the steps how I created the project :( So I just clicked through JDeveloper try to re-construct the same thing. I believe this is a sequence that can create a java based web service in Jdeveloper (11.1.1.6):
Part I - Ceate a "Web Project"
1. select project name
2. select default "serverlet 2.5..."
3. chose "None" on the "page flow technology" screen
4. chose no libraries.
5. select doc root, app name, context root etc.
6. finish
Part II - add a Java class,
add the public methods as you need
Part III - add "Web Services->Java Web Service"
select your java class, from that point on, pretty much follow the screen. That should just work.
====
hmm, i did find another way to create the Java web service: you can start with a generic application, then select "Web Services" for the default project, then "java" is selected by default. However, this process only works for the 1st default project. Once the application is created, and you try to add new project, and you pick "web services", you'll get different options, talking about confused...
Ironically, the purpose of this blog is keep track what i did and how i did it. But it has been several weeks since I worked on it, I already forgot the steps how I created the project :( So I just clicked through JDeveloper try to re-construct the same thing. I believe this is a sequence that can create a java based web service in Jdeveloper (11.1.1.6):
Part I - Ceate a "Web Project"
1. select project name
2. select default "serverlet 2.5..."
3. chose "None" on the "page flow technology" screen
4. chose no libraries.
5. select doc root, app name, context root etc.
6. finish
Part II - add a Java class,
add the public methods as you need
Part III - add "Web Services->Java Web Service"
select your java class, from that point on, pretty much follow the screen. That should just work.
====
hmm, i did find another way to create the Java web service: you can start with a generic application, then select "Web Services" for the default project, then "java" is selected by default. However, this process only works for the 1st default project. Once the application is created, and you try to add new project, and you pick "web services", you'll get different options, talking about confused...
Subscribe to:
Posts (Atom)